Running and Managing Docker Containers
1. Docker Commands for Running, Stopping, and Restarting Containers
Containers are like mini-computers running inside your computer. You can start, stop, or restart them using a few simple commands.
-
Running a Container
The basic command to run a container is:docker run <options> <image>Example: Running a simple web server (nginx) container:
docker run -d --name mynginx -p 8080:80 nginx-d: Runs the container in the background (detached mode).--name: Gives the container a friendly name.-p 8080:80: Maps port 80 inside the container to port 8080 on your machine.nginx: The name of the image we’re running.
-
Stopping a Container
To stop a running container:docker stop <container_name_or_id>Example:
docker stop mynginx -
Restarting a Container
To restart a stopped container:docker restart <container_name_or_id>Example:
docker restart mynginx -
Checking Running Containers
To see which containers are running:docker psThis will show all currently running containers. To see all running and currently stopped containers:
docker ps -a
2. Container Networking
Containers need to communicate with each other, just like different programs on your computer. Docker gives each container its own network.
-
Bridge Network (Default)
When you run a container, Docker connects it to a default network called the "bridge" network. Containers on the same network can talk to each other. Example:docker network lsThis shows all networks, and you’ll see one named
bridge. -
Creating Your Own Network
Sometimes, you might want to put containers on a custom network. For example, if you have a web server and a database, and they need to talk to each other. You can create a network like this:docker network create mynetworkThen, run containers on that network:
docker run -d --name webserver --network mynetwork nginx
docker run -d --name mydb --network mynetwork mysql
Now both webserver and mydb are on the mynetwork and can communicate.
Example: Flask Application Communicating with MySQL Using Dockerfile and Docker Compose
We’ll create:
- A Flask application with its own Dockerfile.
- A MySQL database container.
- A Docker Compose configuration to manage both containers.
1. Flask Application with Dockerfile
-
Create a Flask Application:
Create a file named
app.pywith the following Flask code:from flask import Flask
import mysql.connector
app = Flask(__name__)
@app.route('/')
def index():
conn = mysql.connector.connect(
host='mysql-db',
user='root',
password='my-secret-pw',
database='mydatabase'
)
cursor = conn.cursor()
cursor.execute("SELECT DATABASE()")
db = cursor.fetchone()
cursor.close()
conn.close()
return f'Connected to MySQL database: {db[0]}'
if __name__ == '__main__':
app.run(host='0.0.0.0', port=5000) -
Create a Dockerfile for the Flask Application:
Create a file named
Dockerfilein the same directory asapp.py:# Use the official Python image from the Docker Hub
FROM python:3.9-slim
# Set the working directory in the container
WORKDIR /usr/src/app
# Copy the current directory contents into the container at /usr/src/app
COPY . .
# Install any needed packages specified in requirements.txt
RUN pip install --no-cache-dir flask mysql-connector-python
# Make port 5000 available to the world outside this container
EXPOSE 5000
# Define environment variable
ENV FLASK_APP=app.py
# Run app.py when the container launches
CMD ["flask", "run", "--host=0.0.0.0"]This Dockerfile:
- Uses a lightweight Python image.
- Copies your Flask application code into the container.
- Installs Flask and MySQL connector.
- Exposes port 5000.
- Runs the Flask application.
2. Docker Compose Setup
-
Create a
docker-compose.ymlFile:Create a file named
docker-compose.ymlin the same directory:version: '3'
services:
mysql-db:
image: mysql
container_name: mysql-db
environment:
MYSQL_ROOT_PASSWORD: my-secret-pw
MYSQL_DATABASE: mydatabase
networks:
- mynetwork
flask-app:
build: .
container_name: flask-app
depends_on:
- mysql-db
networks:
- mynetwork
ports:
- "5000:5000"
networks:
mynetwork:In this setup:
- mysql-db: Uses the official MySQL image.
- flask-app: Builds the Flask application from the Dockerfile.
- Both services are connected to a custom network (
mynetwork).
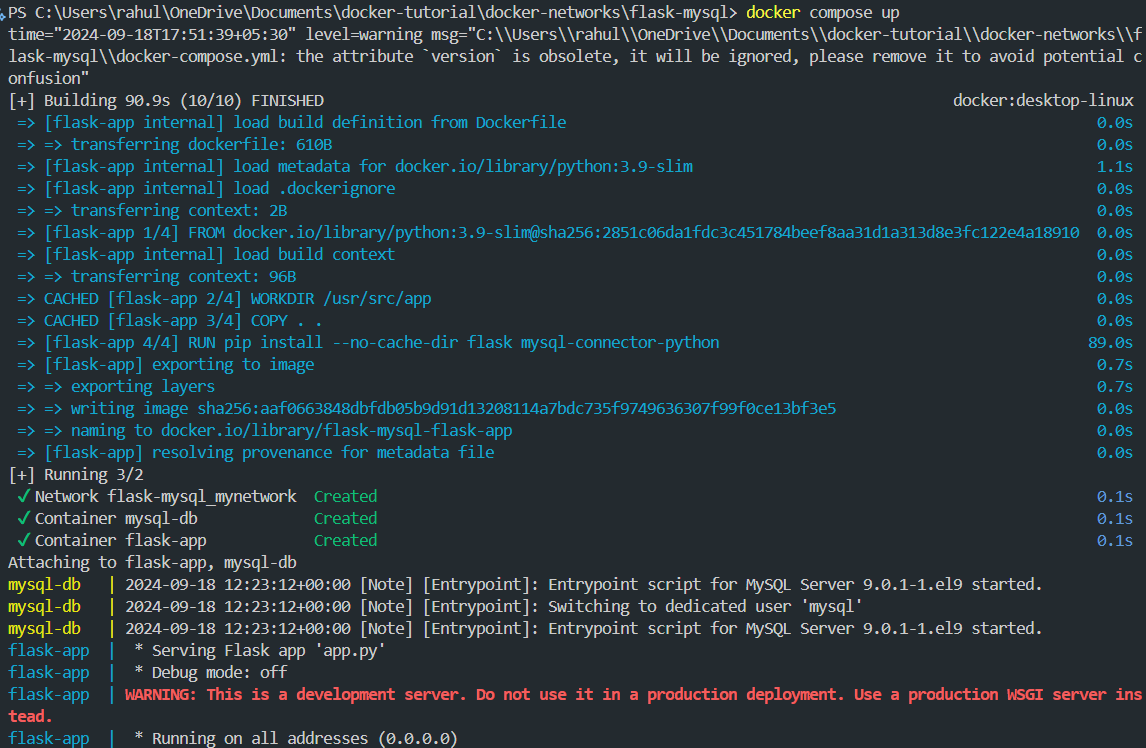
3. Build and Run the Containers
-
Build and Start the Containers:
Run the following command to build and start the containers defined in
docker-compose.yml:docker compose up --buildThis command:
- Builds the Docker image for the Flask app.
- Starts both the Flask and MySQL containers.
- Creates the
mynetworknetwork and connects the containers to it.
-
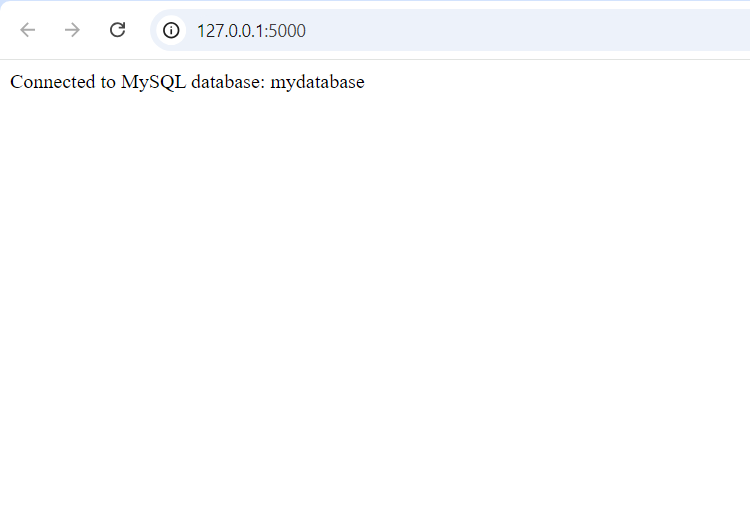
Access the Flask Application:
Open your browser and go to
http://localhost:5000. You should see a message indicating that the Flask application is connected to the MySQL database.
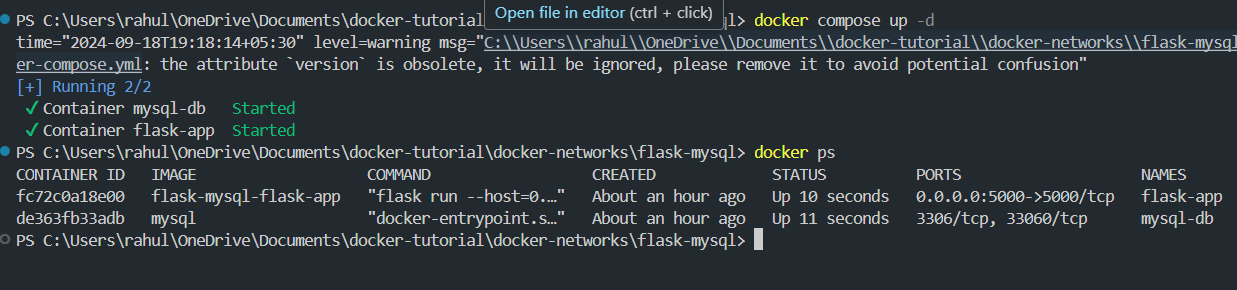
Note : This docker container will be stopped when the terminal is stopped because we are not running it in detached mode. To run in detached mode, use docker compose up -d.
3. Docker Volumes: Persistent Data Storage
I’ll cover:
- Understanding Docker Volumes
- Directory Mounts vs. Named Volumes
- Using Docker Volumes with Docker Compose
- Practical Example: MySQL Data Persistence
Understanding Docker Volumes
Docker volumes are used to store data that needs to persist beyond the lifecycle of a container. They are managed by Docker and can be shared between containers. Volumes provide several benefits:
- Data Persistence: Data in volumes persists even if the container is removed.
- Container Independence: Volumes can be used by multiple containers simultaneously.
- Ease of Backup and Migration: Volumes can be easily backed up and migrated.
Types of Docker Volumes
- Named Volumes: Created and managed by Docker. They are stored in Docker's default storage directory and can be referenced by name.
- Bind Mounts (Directory Mounts): Bind a specific directory on the host machine to a directory in the container. Useful for development as changes on the host are reflected inside the container.
Directory Mounts vs. Named Volumes
Directory Mounts:
- Usage: Directly mount a directory from the host machine into the container.
- Syntax:
volumes:
- /host/path:/container/path - No Explicit Volume Creation Needed: Docker does not manage the lifecycle of bind mounts. You don’t need to create these mounts explicitly; just specify them in your Docker Compose file or
docker runcommand.
Named Volumes:
- Usage: Created and managed by Docker, stored in Docker’s storage directory.
- Syntax:
volumes:
- volume_name:/container/path - Creation: Docker automatically creates named volumes if they don’t exist. You don’t need to create them manually.
Key Differences:
- Directory Mounts: Directly map host directories, useful for development and debugging.
- Named Volumes: Managed by Docker, ideal for persistent data and production environments.
Using Docker Volumes with Docker Compose
In Docker Compose, you can define volumes in the docker-compose.yml file. Docker Compose handles the creation and management of volumes.
Example with Docker Compose:
Let’s set up a MySQL database with persistent storage using Docker Compose.
-
Create a
docker-compose.ymlFile:version: '3'
services:
mysql-db:
image: mysql
container_name: mysql-db
environment:
MYSQL_ROOT_PASSWORD: my-secret-pw
MYSQL_DATABASE: mydatabase
volumes:
- mysql-data:/var/lib/mysql
networks:
- mynetwork
volumes:
mysql-data:
networks:
mynetwork:- Named Volume (
mysql-data):- Defined under
volumesin thedocker-compose.ymlfile. - Docker Compose creates this volume automatically if it doesn’t exist.
- The data stored in
/var/lib/mysqlinside the container is persisted in themysql-datavolume.
- Defined under
- Named Volume (
-
Build and Run the Containers:
Use Docker Compose to start the services and manage the volume:
docker-compose up -d -
Verify the Volume:
After starting the containers, you can list volumes and inspect them:
docker volume ls
docker volume inspect docker-volumes_mysql-data
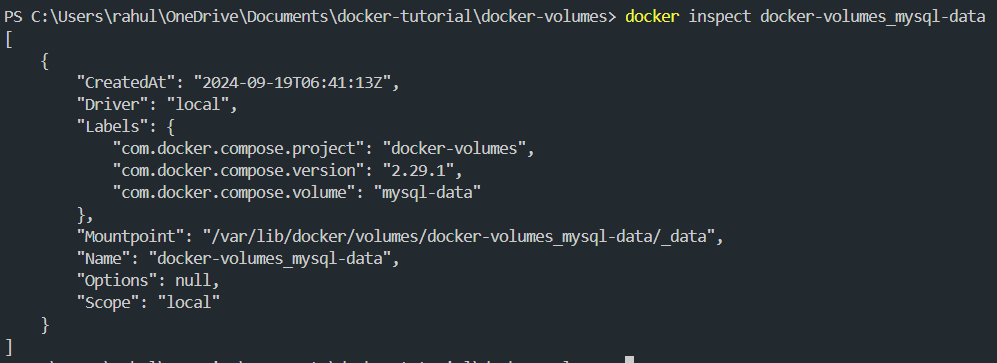
This command shows information about the mysql-data volume, including its mount point on the host.
Note: If the name you specified for your volume in docker-compose is mysql-data, then the actual name of the volume created by docker will be docker-volumes_mysql-data.
Example with Directory Mount:
Here’s an example of using a bind mount (directory mount) instead of a named volume:
-
Create a
docker-compose.ymlFile:version: '3'
services:
mysql-db:
image: mysql
container_name: mysql-db
environment:
MYSQL_ROOT_PASSWORD: my-secret-pw
MYSQL_DATABASE: mydatabase
volumes:
- ./data:/var/lib/mysql
networks:
- mynetwork
networks:
mynetwork:- Bind Mount (
./data):- Maps a specific directory on the host to the container directory.
- Any data stored in
/var/lib/mysqlinside the container is directly mapped to data directory on the host.
- Bind Mount (
In this case, docker will create folder named data on the directory where the docker-compose.yml is present and mounts it to the /var/lib/mysql directory inside the docker container.
In this example, if you don't use a volume or directory mount with this mysql container, all the data in your database will be erased everytime the container is deleted since containers don't have permanent storage. Here the location /var/lib/mysql inside the container is where mysql stores it's data hence we mount a volume to that location.
Summary
-
Running and Managing Docker Containers:
- Commands: Use
docker runto start containers,docker stopanddocker restartto manage their state, anddocker rmto remove them. - Networking: Containers can communicate over custom networks created with
docker network create. Use container names for communication within the same network.
- Commands: Use
-
Docker Volumes:
- Named Volumes: Managed by Docker, providing persistent storage that automatically persists data even if containers are removed. Defined in Docker Compose under the
volumeskey. - Directory Mounts (Bind Mounts): Map specific directories from the host to the container. Useful for development as changes on the host are reflected inside the container. Not managed by Docker; specified directly in the Docker Compose file.
- Named Volumes: Managed by Docker, providing persistent storage that automatically persists data even if containers are removed. Defined in Docker Compose under the
-
Using Docker Volumes with Docker Compose:
- Named Volume Example: Docker Compose can automatically create and manage volumes for persistent data. Example configuration:
volumes:
mydata: - Bind Mount Example: Mounts a directory from the host to the container. Example configuration:
volumes:
  - /host/path:/container/path
- Named Volume Example: Docker Compose can automatically create and manage volumes for persistent data. Example configuration:
-
Network Communication Example:
- Containers on the Same Network: Containers can communicate using their service names when they are on the same Docker network, as defined in Docker Compose or manually created networks.